Thursday, November 26, 2009

Is Tapioca aka Cassava or Ubi Kayu Safe to Eat?


Tapioca commonly known as ubi kayu in the Malay language and 木薯 (mushu)in Chinese. In both languages, it is aptly named because of its woody appearance. It is primarily grown in many Pacific Island countries and also in many parts of Asia, including Indonesia. In Papua New Guinea, the plant is grown for its edible tubers, which serve as a staple food in many parts of the country. The majority of frozen tapioca found in many Asian grocery stores is imported into Australia from Pacific Island countries such as Fiji and Tonga. Historically, its value as a famine relief crop has long been recognized. In many parts of South East Asia during the Second World War many people survived on tapioca roots. But on other hand, it has been reported that raw tapioca or unprocessed tapioca can be a potential public health and safety risk due to the presence of cyanogenic glycosides in the raw or unprocessed tapioca. This can lead to exposure to hydrogen cyanide and its related toxicity.

Is tapioca safe to eat?
Tapioca is safe to eat providing that it is prepared properly. It can be made safe to eat by first peeling and slicing the tapioca and then cooking it thoroughly either by baking, boiling or roasting. Frozen tapioca should also be prepared in this way. Furthermore, the majority of raw or unprocessed tapioca imported into Australia and New Zealand comes from a variety known as sweet cassava which is normally low in cyanide content. Here is a tapioca pudding recipe that has been consumed traditionally in both Singapore and Malaysia and has a long history of safe consumption.
Incidentally it has just won a cooking prize at my workplace!


Chiu Chu Kuih aka Tapioca Baked Pudding Recipe
.

1kg fresh tapioca, peeled and grated, if unavailable, use frozen grated tapioca
385 ml thick coconut cream
1/2 tsp salt
1 1/2 cup sugar
2 eggs beaten
2 tbsp tapioca flour or corn flour.
2 tbsp butter

Grease a 20cmx30cm (8"x12") square tray with butter. Mix all ingredients in a large bowl and stir with a long wooden spoon. Pour mixture into the baking tray. Bake in a preheated oven at 180 C for 35 to 45 minutes or until set. Put under a grill for 15 minutes or until the crust is golden brown. Leave to cool for at least 6 hours before cutting to serve.

Sunday, November 15, 2009

What is tempeh?


Although tempeh is now commonly available in Sydney and can be found in the refrigerated section of most well-stocked grocery stores. It is not as common as I thought among young Singaporeans here.I was surprised to find a number of young Singaporeans who are living away from home and probably cooking for themselves for the first time, have recently emailed to ask what is tempeh and how it is used. On close observation, tempeh looks like a square or rectangular piece of mouldy compressed bean cake Fear of the unknown can often make you stop dead in your tracks of using it in your cooking. For the uninitiated, tempeh is made from cooked and slightly fermented soybeans. A traditional Indonesian food originated from Java, it is made from soybeans, grains, and a mould culture that is fermented and pressed into a block or cake. This vegetarian food can be used as a substitution for meats. Furthermore, I have adapted a recipe to make homemade tempeh and saving half the price you would pay in the supermarkets by using a store bought fresh tempeh as a tempeh starter for the initial start up.
.
To make 1kg tempeh you need the following ingredients:
- 500 g whole dry soybeans
- 3 tbs vinegar
- 200 g of fresh tempeh

Soak the soybeans in 2 liter water overnight. Split the soaked soya beans by squeezing them with a kneading motion in a big basin or bowl. Stir gently causing the hulls to rise to the surface, then pour off water and hulls into a strainer. Add water and repeat until most hulls are removed. Put the hulled soyabeans in a large cooking pot and add water to cover the soybeans. Add 3 tablespoon vinegar and cook for 30 min. In the meanwhile, put the fresh tempeh in a blender and blend until fine like breadcrumbs. Drain off the water and dry the soybeans by continue heating them in the pot on medium heat for a few minutes and until the beans are dry. Allow the soybeans to cool down to below 35°C.


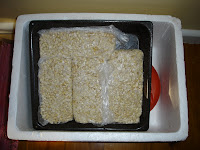
Sprinkle the soybeans with the blended tempeh. Mix with a clean spoon to distribute the blended tempeh evenly. It's very important to mix the blended tempeh very well, it reduces the risk for spoilage and the fermentation will be faster. Take 4 plastic resealable bags 18 x 18 cm and perforate them with holes at a distance of about 1 cm by a thick needle. This will allow the mould to breathe.
Divide the soybeans equally in the four bags and seal them. Press them flat, making sure that the total thickness of the beans is max 3 cm. Place the packed beans in a warm place to incubate for about 36- 48 hours during which the tempeh fermentation takes place. Then the plastic bags should be filled completely with a white mold and bind the soybeans into a cake form. The the entire piece of newly formed tempeh can be lifted out as a whole piece. Keep the fresh tempeh in the fridge to be used within a week or can be kept frozen until needed. Now you know how to make tempeh. Stay tuned on how to cook the tempeh.

Wednesday, November 11, 2009

Kuih Lapis Beras or Kow Teng Kuih aka Nine Layered Kuih


Like many Overseas Singaporeans, cooking a traditional dish without being able to get the main ingredient is a real setback. Believe me, it is usually the main essential ingredient in the recipe that is missing or unavailable. Unless we can find a substitute ingredient and make do with whatever is available locally, we might as well resign and wait until for the next balek kampong to eat and enjoy the real thing. On other hand, it can also be quite rewarding, to produce a replica of the original recipe with a twist of your own. Like this Kow Teng Kuih, we have just cooked for afternoon tea, fresh coconut cream and pandan leaves are required if we follow the original recipe. Even though, both of these ingredients are readily available in the Asian stores at this time of the year, we didn't bother to drive the distance to get them. We simply used canned coconut cream from our pantry and do away with the pandan leaves. Unfortunately, our pandan plant didn't survive the winter cold.


Kuih Lapis Beras or Kow Teng Kuih aka Nine Layered Kuih Recipe.

150 g rice flour
125 g tapioca flour
75 g glutinous rice flour
400 ml can coconut cream
1 cup sugar (300 g sugar)
300 ml water
1 tbsp red food colouring

Sift the rice flour,sugar, tapioca and glutinous rice flour into a mixing bowl. Add in coconut cream and water and mix well. Divide the batter into two portions. Colour one portion red.Heat steamer and heat a well greased round pan (8 inches or 20cm) for 5 minutes. Pour half a cup of white batter onto the heated pan and coat it evenly to about 5mm thick and steam for 5 minutes or until set. Repeat and alternating the white and red batter until all the portion are used up.After steaming the last layer, steam it for another 15 minutes. Let cool completely before cutting as desired and serve.When I was a child, I used to peel the kuih layer by layer to eat them.

Saturday, November 7, 2009

How to make Soyabean Paste aka Taucheo

Most people conveniently buy soyabean paste from the Asian stores or supermarket theses days. This, of course, saves time and energy and convenient to our present hectic lifestyle.But the downside, is that it becomes a noticeable separation between the origin and the end product. What you don't know is when and how it was made, how it was treated and stored prior to your purchase.So much so that it is safe to say that many traditional homemade foodstuff are in danger of becoming a an invisible art. It has become our personal challenge since we started writing in this blog, is to collect as many traditional and family 'secrets' recipes for many to share. For those ambitious few who may wish to create their own pure homemade and traditional foodstuff , a classic recipe is presented here as start to our new challenge in this blog.

Teochew Ah Mah's Taucheo aka Granny's Soyabean Paste

2 cups soyabeans
6 cups water
1/3 cup sea salt

To make two cups of soya bean paste, soak the soyabeans in cold water overnight or at least 8 hours and drain. Heat a wok over medium high heat and add soaked soyabean to toast for about 30 minutes. Making sure the soyabean is not burnt and set aside to cool. Place the soyabeans in a paper bag and roll over with a rolling pin or a wine bottle, to remove the skins. Discard the skins. In a big pot, add the soyabeans with 6 cups of water. Bring it to a high boil and immediately decrease the heat to medium low heat to prevent boilover. Boil gently for about 2 1/2 hours or until soyabeans become tender. Transfer the soyabeans onto a bamboo tray lined with cheese cloth. Cover loosely with banana leaves and keep in a very warm place to ferment for 5 days. In a bowl, combine the fermented soyabeans and mash with the sea salt. Transfer the the soyabeans to a earthen or ceramic jar with a lid. After mellowing for a week, they ready to be used but it best kept in a refrigerator to turn into taucheo. Store in a tightly covered container in the refrigerator and they will keep fresh for months.

Monday, November 2, 2009

Why is melon treated like a durian?


Although durians and melons come from two different families of fruits, they both often undergo the same type of scrutiny by some of their potential buyers before they are bought. Like the durian, melon is smelt for fragrance, weighed and tapped. To pick a good melon, the expert says choose a fruit that feel heavy for its size. When tapped lightly, your melon melon should sound hollow to indicate that it's mature and ripen. Most melon are picked ripe, so their sweetness doesn't increase once it is harvested. Avoid those with bruised, soft, watery,punctured,cracked or decayed rinds Choose a melon with a firm yellowish or creamy underside or ground spot since it rests on the ground as it grows. Of course, buying a cut melon wrapped in cling saves you the guesswork, but look for firm, juicy, deep pink-colored flesh and shiny dark seeds, if any. Avoid flesh with white streaks or a reddish-tan color, or that is either too soft or watery. To prepare melons for serving, chill melons before eating for the best flavor. Wash the dirt from the rind with water before putting it in the refrigerator. Before cutting, rinse the rind again under cold running water. Once cut, cover with a cling wrap to prevent from drying out, then store on the lowest shelf of the fridge for up to three days.